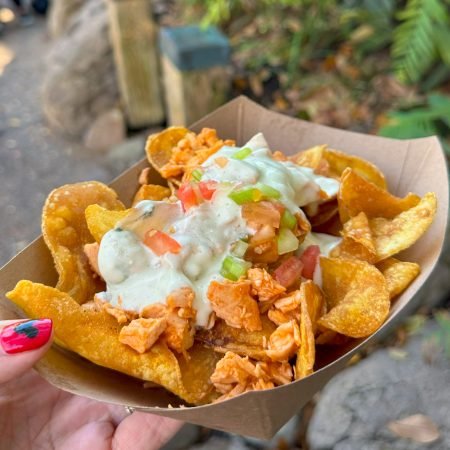
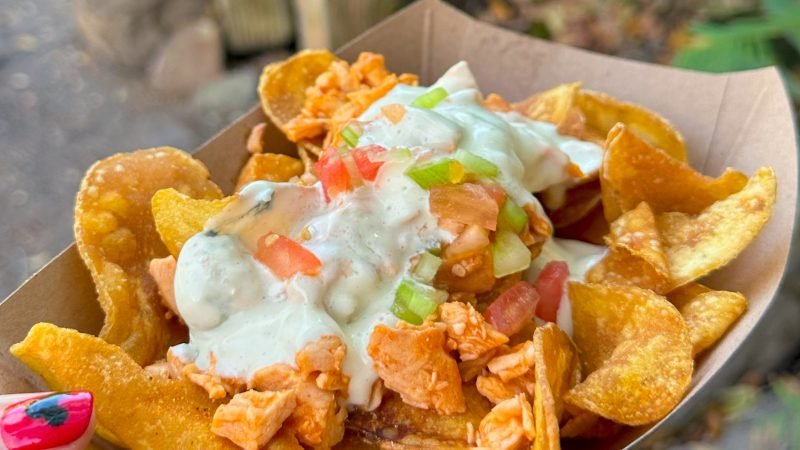
Cooking From Stockpile: Chianti Beef Rigatoni

 Photobucket

This is more of an idea than a recipe and I have to give credit to Romano’s Macaroni Grill.

I had one of the yummiest pasta dishes in my life this weekend at at Romano’s. I LOVE the combination of beef and tomatoes and they have a new dish called Antonio’s Beef Rigatoni that is TO DIE FOR!! It seems like it would be pretty easy to recreate, and since I have a ridiculous amount of canned tomatoes, it would also be a good recipe for the Cooking From My Stockpile series. I am sorry I don’t have amounts but I was just ‘winging it’. The next time I make it, I’ll get some exact measurements.

Cut a lean beef roast into big chunks, trim all away all visible fat and season well with salt and pepper. Brown in some olive oil over medium-high heat until you get good color on all sides. Place in a deep roasting pan (I use a deep ceramic oval roaster). De-glaze the pan you cooked the beef in with about a cup of dry red wine (I used Chianti) and scrape up all the bits. Pour over the beef. Slice up one large onion and add to beef. Add two cans diced tomatoes (I used fire roasted diced tomatoes) to the beef. Cover the beef/onions/tomato with beef broth (I used about a quart and a half). Cover with foil and/or a tight fitting lid. Bake at 350 for 2-3 hours or until the beef falls apart. You want a lot of liquid because this entire mixture becomes your sauce for a pound of pasta. Remove from oven, shred the beef up into the sauce and toss entire mixture with a pound of cooked rigatoni or fettuccine noodles. If the mixture seems too dry, add a little more beef stock. Serve with fresh Parmesan and good bread :-)

The total for this recipe, as ‘fancy’ as it seems, still comes in at under $10.00. The noodles and tomatoes were free after coupons, the broth was very cheap and the roast was $6.79 on sale. I paid about $11 for the wine BUT I will easily get 4-5 meals out of it. Enjoy :-)

This recipe is part of our Cooking From My Stockpile Series

Print Friendly

Never Miss a Deal! Subscribe to Our FREE Daily Newsletter:

Cooking From Stockpile: Beef Vegetable ‘Unfried’ Rice

Beef Vegetable Fried Rice Recipe

INGREDIENTS:

  • 1 Small Flank Steak (cut into bite size pieces) $1.89 (marked down)
  • 2 Bags Steamfresh Brown Rice ($0.20 each after coupons)
  • 1 Bag Steamfresh Broccoli Florets ($0.40 after coupon)
  • 1 Small Can Water Chestnuts $0.97
  • 2 Large Carrots Shredded (I finely shred them in a small food processor) $0.20
  • 1/2 Cup Frozen Peas (about 1/4 of the bag) $0.40
  • 2 Cloves Garlic Crushed $0.20
  • 2 Eggs Scrambled $0.25
  • 1/4 Cup Low Sodium Soy Sauce $0.20
  • 1/4 Cup 365 Organics Soy/Ginger Sauce (from Whole Foods) $0.50

DIRECTIONS:

IMO, the best method for making fried rice or stir-fry is to have everything ready. Once you put the meat in the pan, this recipe goes very quickly so my directions are in the order that I do it.

  1. Cook the rice and broccoli in the microwave according to the package directions and set aside.
  2. Cook the eggs and set aside.
  3. Rinse the frozen peas with hot water and set aside.
  4. Open and drain the water chestnuts and set aside.
  5. Heat one tablespoon olive oil over high heat in a large skillet. When the oil is hot, add the beef and one tablespoon of the low sodium soy sauce. Cook for 2-3 minutes or until just cooked through.
  6. Turn the heat way down to medium-low, add the garlic and carrots and cook for about 2-3 minutes.
  7. Add the broccoli, water chestnuts, peas, rice, eggs, remaining soy sauce and soy/ginger sauce.
  8. Stir constantly until ingredients are mixed well and heated through.
  9. Taste and adjust for seasoning. Salt, pepper or more sauce…whatever you like.
  10. Serve immediately.

Total cost: $5.41 made a huge pan. More than enough for dinner and lunch the next day!

My family loves fried rice so I am always making these ‘unfried’ versions and no two are ever the same. I really like using the different oriental sauces to change it up and frozen microwavable veggies eliminate the need for all the chopping. Super quick, super healthy and very affordable! Who says eating healthy isn’t easy AND affordable?? BTW I was able to get the flank steak so cheap because my meat manager had just marked them down :-)

This recipe is part of our Cooking From My Stockpile Series

Print Friendly

Never Miss a Deal! Subscribe to Our FREE Daily Newsletter:

Cooking From Stockpile: Tuna Casserole

Bumble Bee Tuna

What do you do with 50+ packages of tuna? Why Tuna Casserole of course! A few months ago I traded some formula coupons for 100+ tuna coupons, which at the time, made it free at Kroger (actually free with overage). Tonight I used the recipe I posted last year, but in an effort to ONLY use things from my pantry, I didn’t do the panko topping. I also replaced the three cans of tuna with 4 envelopes (pictures above). I replaced the panko with crushed Ritz crackers.

This recipe is part of our Cooking From My Stockpile Series

Print Friendly

Never Miss a Deal! Subscribe to Our FREE Daily Newsletter:

Cooking From Stockpile: Bean Soup

One of the biggest struggles I have had since my son and husband left has been with food. I have WAY too much of it! My daughter and I can only eat SO much and I have a huge stockpile so I have decided to try cook as much from my stockpile as possible. Tonight I made a quick and easy bean soup with what I have on hand. The ham cost me about $3 and all the canned goods were nearly free after coupons. It was healthy, cheap and we have plenty of leftovers…and we love bean soup!

A Little Bit of Everything Bean Soup 

  • 2-3 Tablespoons Olive Oil
  • 1  Ham Steak - Fat trimmed off and cubed
  • 1/2 Bag Recipe Beginnings (frozen pre-chopped onion, carrot, celery)
  • 1 Can Diced Tomatoes
  • 1 Can Garbanzo Beans
  • 1 Can Light Kidney Beans
  • 1 Can Black-Eyed Peas (yes I said Black-eyed Peas…stay with me)
  • 1 Quart Chicken Broth
  • 3 Cloves Garlic Crushed
  • 1 Teaspoon Italian Seasoning
  • Salt and Pepper to taste
  • Water

In a 5-quart pot, brown the ham in the olive oil until it is a little crispy. Add the veggies and the garlic, cook for about 5 minutes and then add all remaining ingredients except the salt and pepper. Let simmer on low for about an hour to an hour and a half. Bean soups can get very thick so add water as needed. I also had some ciabatta rolls I needed to use so I made a quickie garlic bread. I spilt them in half, sprinkled them lightly with garlic powder, salt and pepper, spread them with Best Life Butter Spray (my new favorite thing) and broiled them until they were lightly browned. 

This was one of THE best bean soups I have ever made. It has never crossed my mind to add tomatoes to a bean soup. Pasta Fagioli maybe, but not a ‘ham and bean’ soup. We LOVED it. These ‘throw everything in the pot’ kind of meals are always the best. This was a great start to using up my stockpile :-)

This recipe is part of our Cooking From My Stockpile Series

Print Friendly

Never Miss a Deal! Subscribe to Our FREE Daily Newsletter: